Add Nodes in Bulk via CSV
Cloudhouse Guardian (Guardian) offers the ability to import nodes in bulk from a number of sources, including AWS, Azure, CSV files, and more. This topic describes how to add nodes in bulk by importing them into your instance from a Comma-Separated Values (CSV) file. To do this, you are required to prepare, populate, and import the CSV file containing the nodes you want to add. For more information, see Add Nodes in Bulk.
Note: If importing from the an existing source, any existing nodes that are detected are not re-added to your Guardian instance. If any changes have occurred on the node since the last import, the existing node is updated accordingly.
Dependencies
To import nodes in bulk from a CSV file, the following dependencies must be met:
- CSV File – Prepared, with the correct columns set. For more information, see Prepare the CSV File.
- Nodes – List of nodes to be imported, including the node-specific information required to populate the CSV file. For more information, see Populate the CSV File.
- Connection Manager – Configured within your Guardian instance. For more information, see Connection Managers.
Prepare the CSV File
To import nodes in bulk, you need to provide identifying information about your target nodes in a CSV file. Depending on your deployment type, the information required will vary. There are 23 possible columns that you could include in your CSV file; some are mandatory for all node types, others are optional, and several are required only if your method of deployment meets the described criteria.
CSV File Template
Cloudhouse provides a template CSV file for importing nodes that contains the complete set of columns. We recommend using this template to ensure that you have the correct columns set.
To download the Cloudhouse template CSV file, complete the following steps:
-
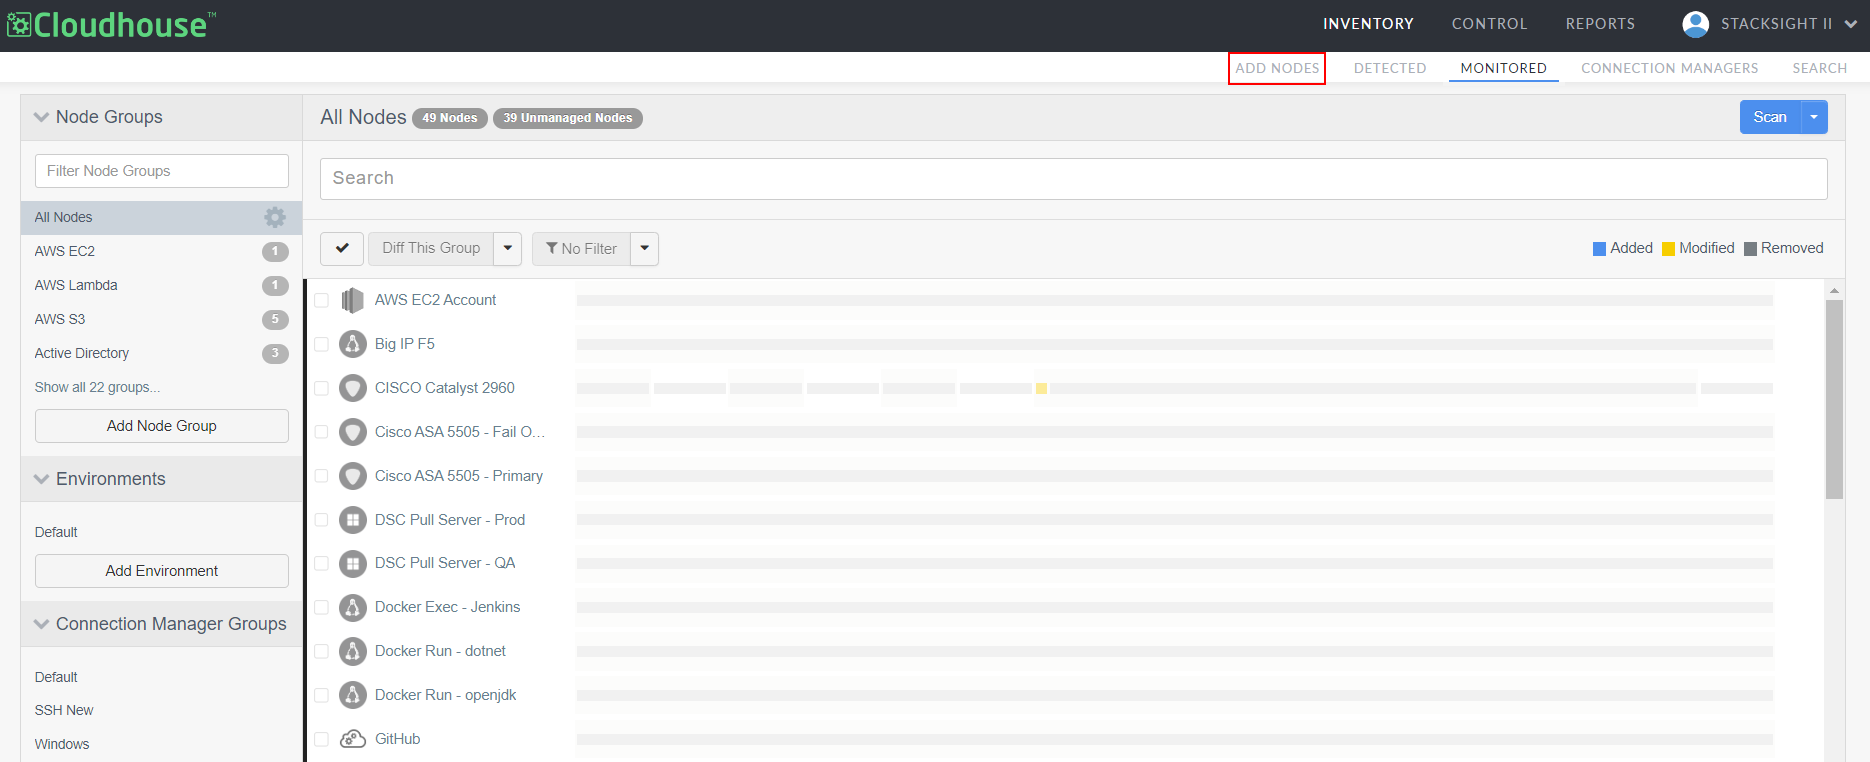
In the Guardian web application, navigate to the Add Nodes tab (Inventory > Add Nodes).
-
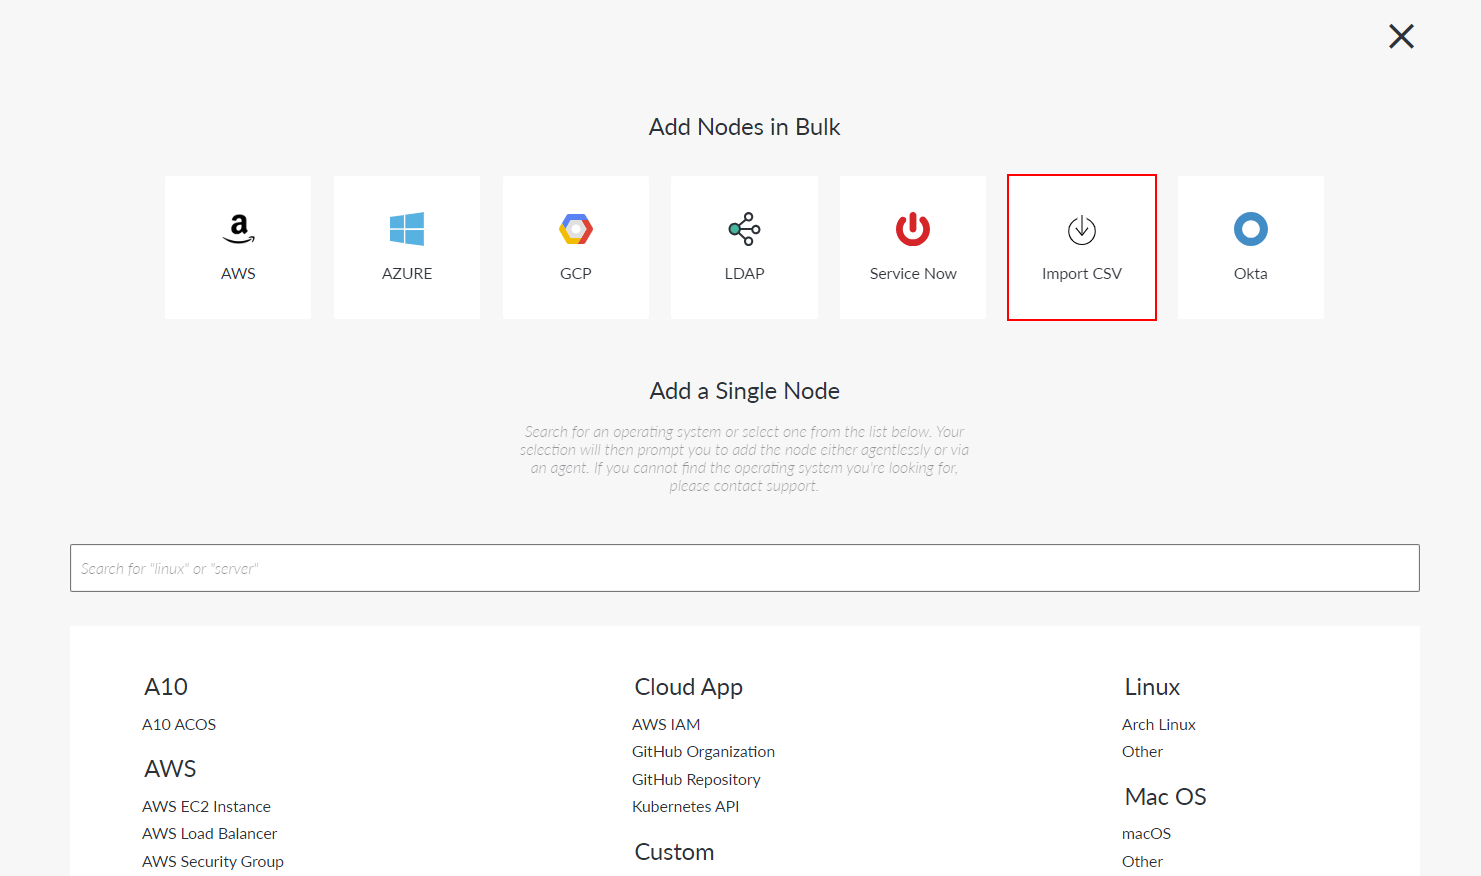
Click the Import CSV button. The Add Nodes Via CSV page is displayed.
-
Click to Download Template.
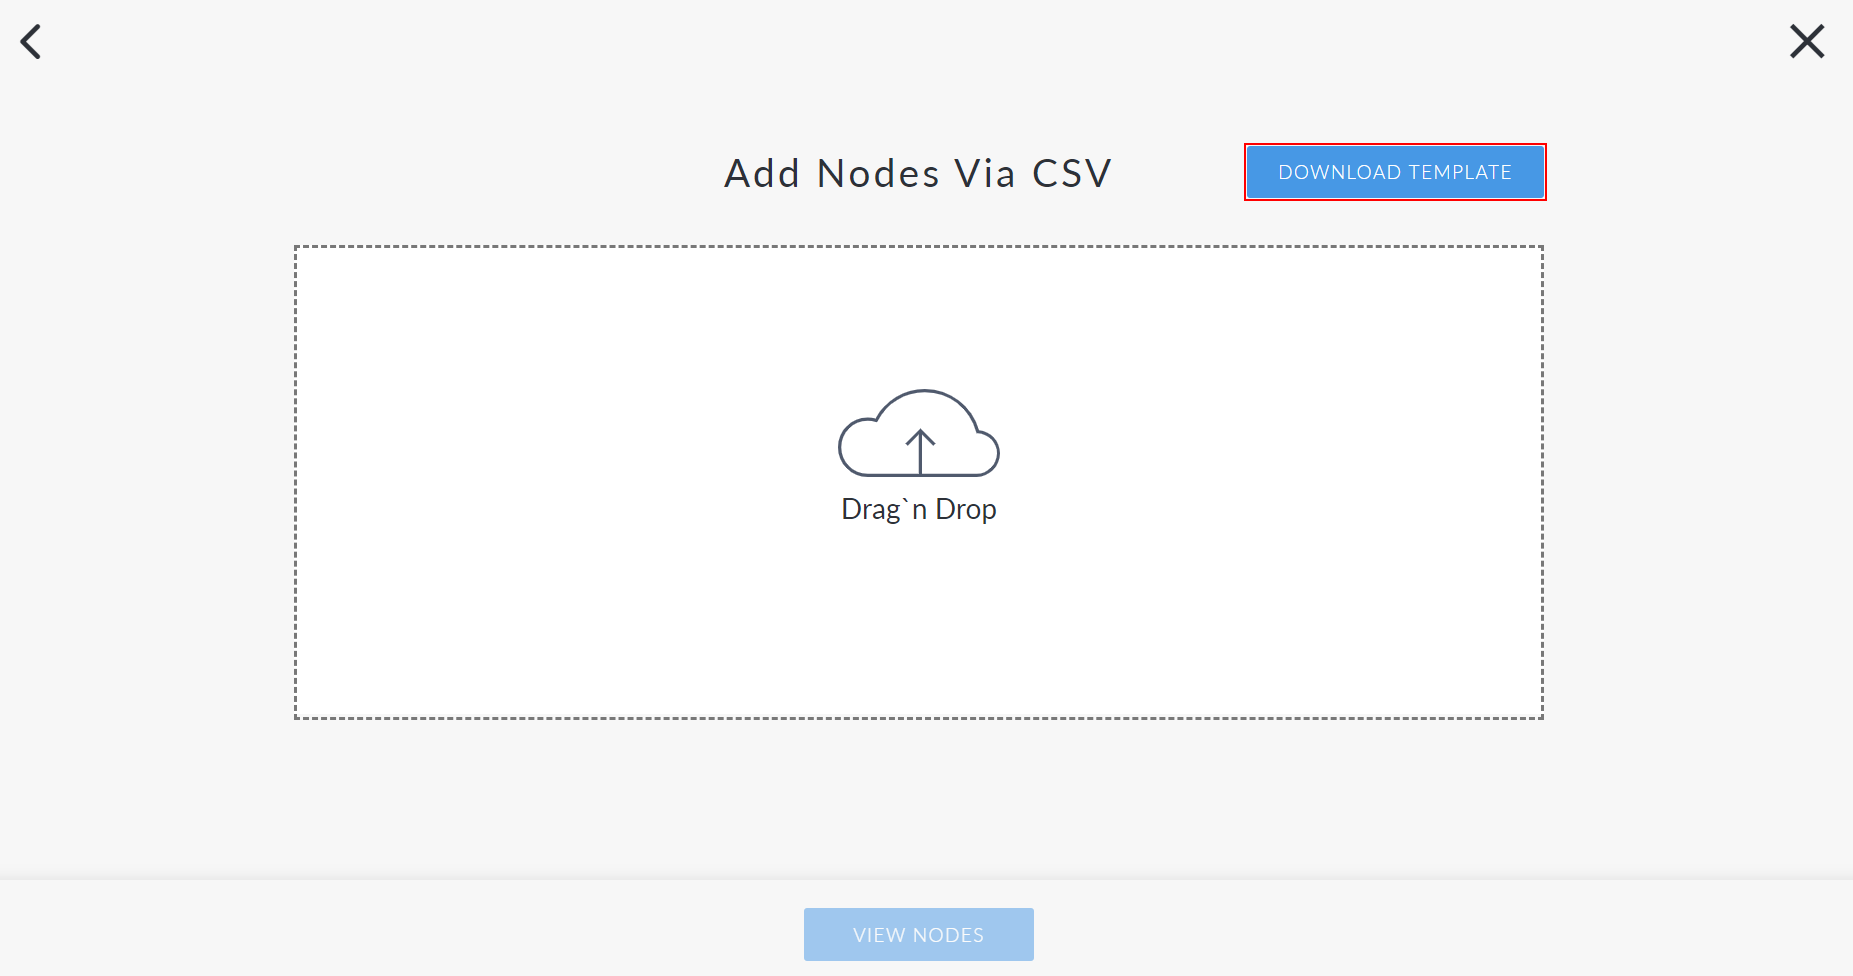
Once complete, the Cloudhouse template is downloaded locally to your device. Next, you can begin populating the CSV file. For more information, see Populate the CSV File. Alternatively, you can choose to create your own CSV file. However, you are responsible for ensuring that you have the correct columns set for your deployment type, see below for more information.
CSV File Columns
The following list describes the complete set of columns that could be included in the CSV file, depending on your deployment type:
| Columns | Notes |
|---|---|
| name | Mandatory |
| node_type | Mandatory |
| medium_type | Mandatory |
| medium_username | For Windows: Required if you are using the Connection Manager without a Windows service user account. For Linux: Required if the medium_username is specified and you are not using SSH authentication via a public/private key pair. |
| medium_password | For Windows: Required if you are using the Connection Manager without a Windows service user account. For Linux: Required if the medium_username is specified and you are not using SSH authentication via a public/private key pair. |
| medium_port | Optional |
| medium_hostname | Required if you are using the Linux/Windows Connection Manager. |
| short_description | Optional |
| connection_manager_group_ID | Required if you are using the Linux/Windows Connection Manager. |
| operating_system_family_ID | Required if you are using the Linux/Windows Connection Manager. |
| operating_system_ID | Required if you are using the Linux/Windows Connection Manager. |
| URL | Optional |
| external_ID | Optional |
| environment_ID | Optional |
| target_node_group_ID | Optional |
| websphere_install_path | Required if you are importing Websphere nodes. |
| websphere_profile_name | Required if you are importing Websphere nodes. |
| websphere_cell_name | Required if you are importing Websphere nodes. |
| websphere_node_name | Required if you are importing Websphere nodes. |
| websphere_jvm_name | Required if you are importing Websphere nodes. |
| azure_subscription_id | Required if you are importing Azure nodes. |
| azure_ad_tenant_id | Required if you are importing Azure nodes. |
| azure_ad_client_id | Required if you are importing Azure nodes. |
For more information on how to populate these columns, see below.
Populate the CSV File
Once you have prepared your CSV file, you can begin to populate it with the information required to import your target nodes. The following section describes each column, what it is required for, and what you need to include in the corresponding row. Once the CSV file has been populated with the correct information, you can import the file into Guardian, see Import the CSV File for more information.
Name Mandatory
The name of the node. The value you enter here will be used as the display name in Guardian. Once imported, the node(s) will be displayed in the Monitored tab (Inventory > Monitored).
Node_Type Mandatory
The type of node being imported. Provide the corresponding code for the type of node being imported, by using the following table.
| Node Type | Code |
|---|---|
| Server | SV |
| Desktop | DT |
| Network Switch | SW |
| Firewall | FW |
| Router | RT |
| SAN Storage | SS |
| Website | WS |
Medium_Type Mandatory
The method that Guardian will use to contact the node when gathering configuration data. Provide the corresponding code for the method being used, by using the following table.
| Connection Type | Code |
|---|---|
| Agent | 1 |
| Linux Connection Manager (SSH) | 3 |
| HTTPS | 6 |
| Windows Connection Manager (WinRM) | 7 |
| Service | 8 |
| Web | 9 |
For most deployments, the following codes will be used:
| Code | Description |
|---|---|
| 1 | Any node with the Guardian Agent installed. |
| 3 | Any node with the Linux Connection Manager installed. This also applies to network nodes. |
| 7 | Any node with the Windows Connection Manager installed. This also applies to database nodes. |
Medium_Username Agentless
The username of the service account configured to use SSH/WinRM. Provide the username, if the following criteria is met:
- You are using the Linux/Windows Connection Manager.
- You are not running the 'Guardian' service on the Windows Connection Manager as a service user account.
Medium_Password Agentless
The password of the service account configured to use SSH/WinRM. Provide the password, if the following criteria is met:
- The medium_username is provided.
- You are not using a public/private key pair to authenticate SSH.
Medium_Port Optional
The network port that Guardian will use. If you are using a Connection Manager, the following ports will be automatically set:
- Linux – 22.
- Windows – 5985.
Medium_Hostname Agentless
The node's hostname or IP address. Provide the corresponding hostname or IP address to connect to for Agentless scanning via the Linux/Windows Connection Manager.
Note: Typically, this is the fully qualified domain name (FQDN). However, it could also be the IP address.
Short_Description Optional
Optional field to provide additional information about a node.
Connection_Manager_Group_ID Agentless
The ID of the Connection Manager group that is responsible for scanning the node(s). If you are using a Linux/Windows Connection Manager, you are required to provide the ID of the group it belongs to, by completing the following process:
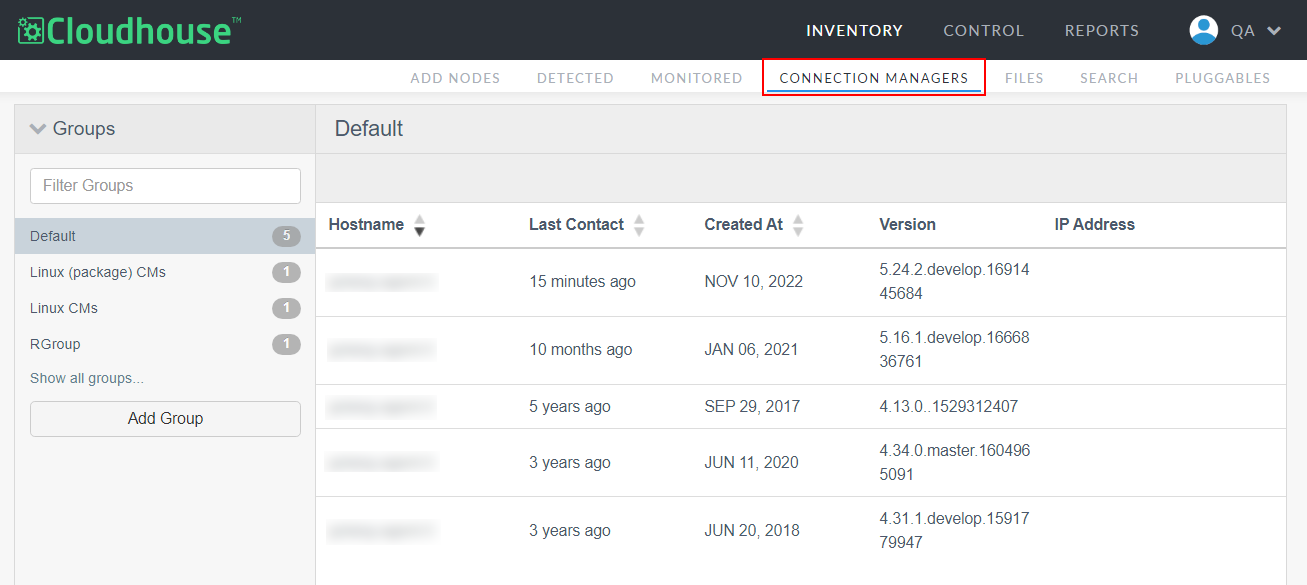
- In the Guardian web application, navigate to the Connection Managers tab (Inventory > Connection Managers).
-
Select the Connection Manager group that you want to use for scanning.
-
The Connection Manager group is displayed. In the URL, note the digits that are displayed after 'group/'. This is the Connection Manager group ID.
Operating_System_Family_ID Agentless
The ID of the operating system (OS) family. Provide the corresponding ID for the OS family being used, by using the following table:
| OS Family | ID |
|---|---|
| Windows | 1 |
| Linux | 2 |
| Unix | 3 |
| Mac OS | 5 |
| Cisco | 7 |
| Juniper | 8 |
| IBM | 9 |
| HP | 11 |
| Palo Alto | 12 |
| Brocade | 13 |
| Cloud App | 14 |
| Riverbed | 15 |
| Web Site | 16 |
| Arista | 17 |
| Custom | 18 |
| Database | 19 |
| Hypervisor | 20 |
| Aruba | 21 |
| Citrix | 22 |
| A10 | 23 |
| NetApp | 24 |
| Dell | 25 |
| Directory | 26 |
| Azure | 27 |
| AWS | 28 |
| SAP | 29 |
| GCP | 30 |
Operating_System_ID Agentless
The ID of the OS host. Provide the corresponding ID for the OS being used, by using the following table.
| OS | OS ID | OS Family ID |
|---|---|---|
| Debian | 211 | 2 |
| Ubuntu | 221 | 2 |
| CentOS | 231 | 2 |
| RockyLinux | 232 | 2 |
| AlmaLinux | 233 | 2 |
| CloudLinux | 235 | 2 |
| RedHat | 241 | 2 |
| Amazon Linux | 245 | 2 |
| F5 | 248 | 2 |
| F5 Linerate | 249 | 2 |
| SUSE | 251 | 2 |
| Fedora | 261 | 2 |
| Oracle Linux | 271 | 2 |
| CoreOS | 281 | 2 |
| Arch Linux | 282 | 2 |
| Other Linux | 299 | 2 |
| Exchange 2010 | 127 | 1 |
| Windows Server 2022 | 133 | 1 |
| Windows Server 2019 | 131 | 1 |
| Windows Server 2016 | 129 | 1 |
| Windows Server 2012 | 125 | 1 |
| Windows Server 2012 R2 | 128 | 1 |
| Windows Server 2008 | 123 | 1 |
| Windows Server 2003 | 122 | 1 |
| Windows 10 | 126 | 1 |
| Windows 11 | 134 | 1 |
| Windows 8 | 124 | 1 |
| Windows Vista | 113 | 1 |
| Windows 7 | 112 | 1 |
| Windows XP | 111 | 1 |
| Other Windows | 199 | 1 |
| AIX | 311 | 3 |
| AIX-WPAR | 351 | 3 |
| HP-UX | 321 | 3 |
| Solaris | 331 | 3 |
| Other Unix | 399 | 3 |
| FreeBSD | 411 | 4 |
| NetBSD | 421 | 4 |
| OpenBSD | 431 | 4 |
| Other BSD | 499 | 4 |
| Mac OS X | 511 | 5 |
| Other Mac OS | 599 | 5 |
| Cisco IOS | 711 | 7 |
| Cisco NX-OS | 721 | 7 |
| Cisco ASA | 731 | 7 |
| Cisco FWSM | 741 | 7 |
| Cisco CATOS | 751 | 7 |
| Other Cisco | 799 | 7 |
| JunOS | 811 | 8 |
| ScreenOS | 821 | 8 |
| Other Juniper | 899 | 8 |
| IBM XIV | 911 | 9 |
| IBM SVC | 912 | 9 |
| IBM Z/OS | 913 | 9 |
| IBM WebSphere | 914 | 9 |
| Other IBM | 999 | 9 |
| EMC Symmetric | 1011 | 10 |
| Other EMC | 1099 | 10 |
| HP Comware OS | 1111 | 11 |
| HP Procurve | 1131 | 11 |
| HP 3PAR | 1121 | 11 |
| Other HP | 1199 | 11 |
| Palo Alto 500 | 1211 | 12 |
| Palo Alto M-100 | 1212 | 12 |
| Palo Alto 6 | 1213 | 12 |
| Other Palo Alto | 1299 | 12 |
| FabricOS | 1311 | 13 |
| Other Brocade | 1399 | 13 |
| CloudFlare | 1411 | 14 |
| Salesforce | 1413 | 14 |
| Office 365 Exchange | 1414 | 14 |
| AWS EC2 | 1415 | 14 |
| AWS S3 | 1416 | 14 |
| AWS RDS | 1418 | 14 |
| AWS Lambda | 1419 | 14 |
| AWS IAM | 1420 | 14 |
| Azure Resource Manager | 1417 | 14 |
| GitHub Organization | 1450 | 14 |
| GitHub Repository | 1451 | 14 |
| Kubernetes API | 1460 | 14 |
| Riverbed Steelhead | 1511 | 15 |
| Riverbed CMC | 1512 | 15 |
| Website | 1600 | 16 |
| Arista EOS | 1711 | 17 |
| JSON File | 1811 | 18 |
| Script Path | 1812 | 18 |
| PowerShell | 1813 | 18 |
| Windows Script Path | 1814 | 18 |
| Microsoft SQL | 1901 | 19 |
| MySQL | 1902 | 19 |
| Oracle | 1903 | 19 |
| PostgreSQL | 1904 | 19 |
| DB2 | 1905 | 19 |
| Sybase | 1906 | 19 |
| VMware ESXi 5.1 | 2001 | 20 |
| VMware ESXi 5.5 | 2002 | 20 |
| VMware ESXi 6.0 | 2003 | 20 |
| VMware ESXi 6.5 | 2004 | 20 |
| VMware ESXi 7.0 | 2005 | 20 |
| ArubaOS | 2101 | 21 |
| Citrix Netscaler | 2201 | 22 |
| A10 ACOS | 2301 | 23 |
| Data Ontap | 2401 | 24 |
| Clustered Data Ontap | 2402 | 24 |
| SonicOS | 2501 | 25 |
| Linux Directory | 2602 | 26 |
| MacOS Directory | 2605 | 26 |
| Windows Directory | 2607 | 26 |
| Azure App Service | 2702 | 27 |
| Azure Key Vault | 2703 | 27 |
| Azure Virtual Machine | 2704 | 27 |
| Azure Storage | 2705 | 27 |
| Azure SQL | 2706 | 27 |
| Azure PostgreSQL | 2707 | 27 |
| Azure MySQL | 2708 | 27 |
| Azure Security Group | 2709 | 27 |
| Azure Network Watcher | 2710 | 27 |
| Azure Active Directory | 2711 | 27 |
| Azure Activity Log Alert | 2712 | 27 |
| Azure Virtual Network | 2713 | 27 |
| Azure Virtual Machine Scale Set | 2714 | 27 |
| Azure Change Analysis | 2715 | 27 |
| Azure Firewall | 2716 | 27 |
| Azure Firewall Policy | 2717 | 27 |
| Azure VWAN | 2718 | 27 |
| Azure VPN Gateway | 2719 | 27 |
| Azure Private DNS Zone | 2720 | 27 |
| Azure Function App | 2721 | 27 |
| AWS EC2 Instance | 2801 | 28 |
| AWS Load Balancer | 2802 | 28 |
| AWS Security Group | 2802 | 28 |
| AWS CloudWatch | 2804 | 28 |
| AWS EBS Volume | 2805 | 28 |
| AWS VPC Flow Log | 2806 | 28 |
| AWS IAM Account | 2807 | 28 |
| AWS Lambda Function | 2807 | 28 |
| AWS RDS Instance | 2809 | 28 |
| AWS S3 Bucket | 2810 | 28 |
| AWS VPC Peering Connection | 2811 | 28 |
| AWS VPC | 2812 | 28 |
| AWS Auto Scaling Group | 2813 | 28 |
| AWS CloudTrail | 2814 | 28 |
| AWS Config Service | 2815 | 28 |
| AWS SNS | 2816 | 28 |
| AWS IAM Access Analyzer | 2817 | 28 |
| AWS KMS | 2818 | 28 |
| AWS VPC Subnet | 2819 | 28 |
| AWS Load Balancer V2 | 2820 | 28 |
| AWS CloudFormation | 2821 | 28 |
| SAP PLM | 2901 | 29 |
| SAP Supply Chain IoT | 2902 | 29 |
| CIDEON Conversion Engine | 2903 | 29 |
| Reiss JsConverter | 2904 | 29 |
| GCP VM Instance | 3001 | 30 |
| GCP Storage Bucket | 3002 | 30 |
| GCP Cloud KMS | 3003 | 30 |
| GCP Cloud DNS | 3004 | 30 |
| GCP Cloud SQL | 3005 | 30 |
| GCP Cloud Logging | 3006 | 30 |
| GCP Kubernetes Engine | 3007 | 30 |
| GCP IAM | 3008 | 30 |
| GCP BigQuery | 3009 | 30 |
| GCP Compute Engine | 3010 | 30 |
URL Optional
Depending on the node type, the URL can be set to one of two values:
- Database node – Connection string for the database.
- Website – Website URL.
This field is not required for any other node types.
External_ID Optional
The reference value for an external system. This field is particularly useful for keeping track of systems that use their own set of IDs, such as an internal CMDB or your AWS EC2 ID.
Environment_ID Optional
The ID of the environment that you want the nodes to be stored in. To locate the environment ID, complete the following process:
Note: If you do not provide an environment ID, the nodes are automatically added to the 'Default' environment.
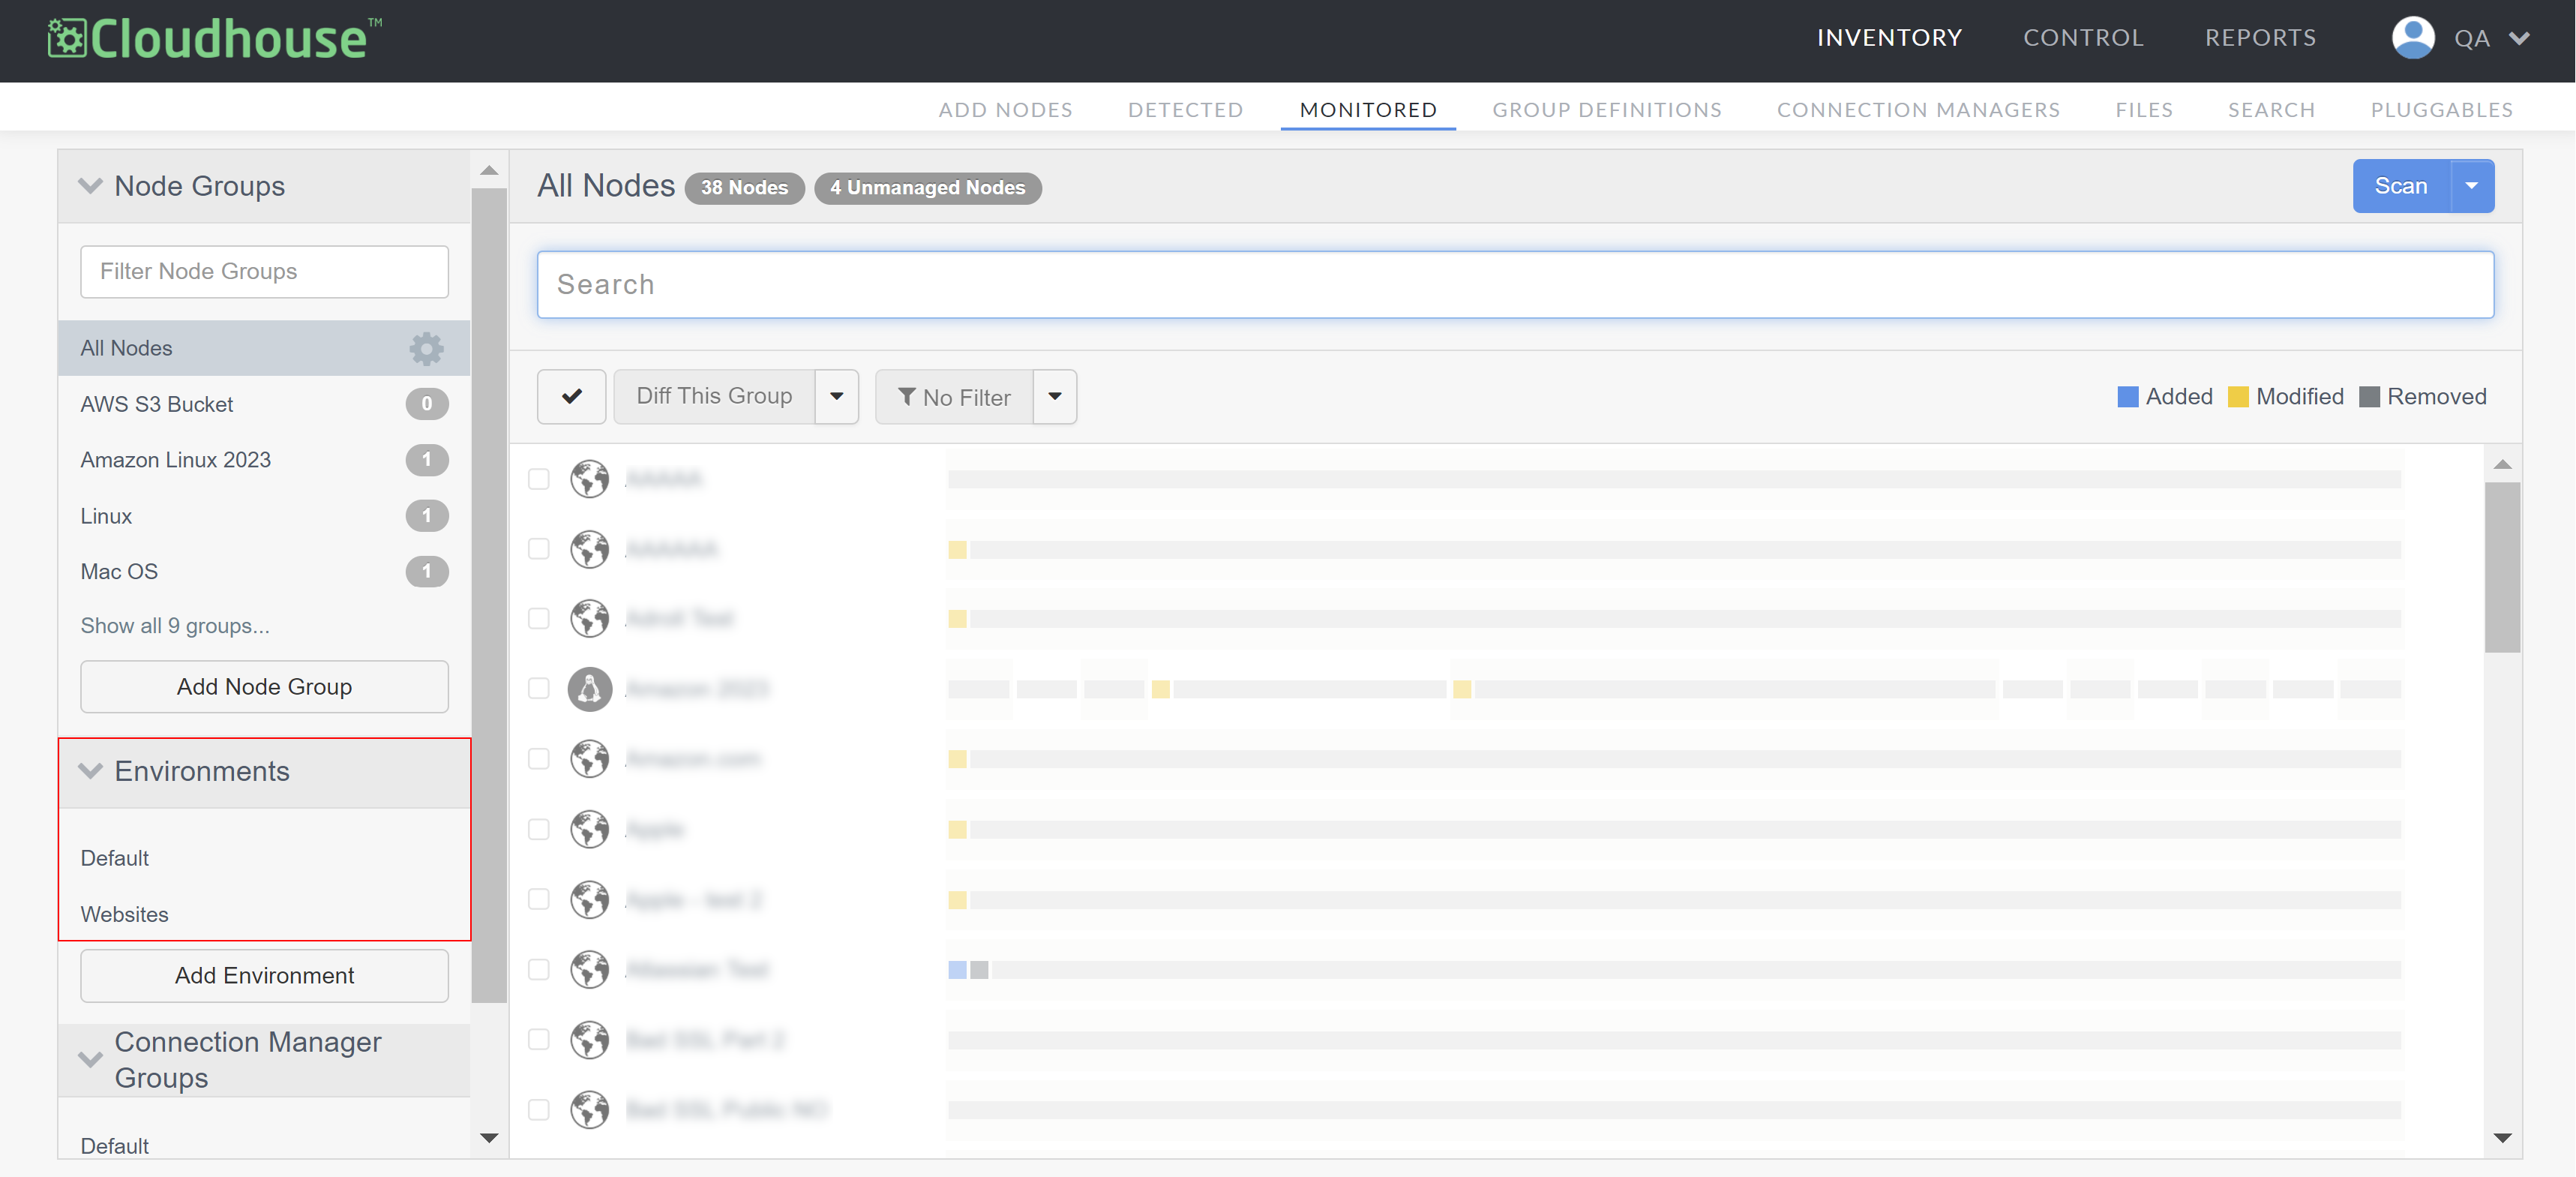
- In the Guardian web application, navigate to the Monitored tab.
-
In the Environments drop-down menu, select the environment that you want to add the nodes to.
-
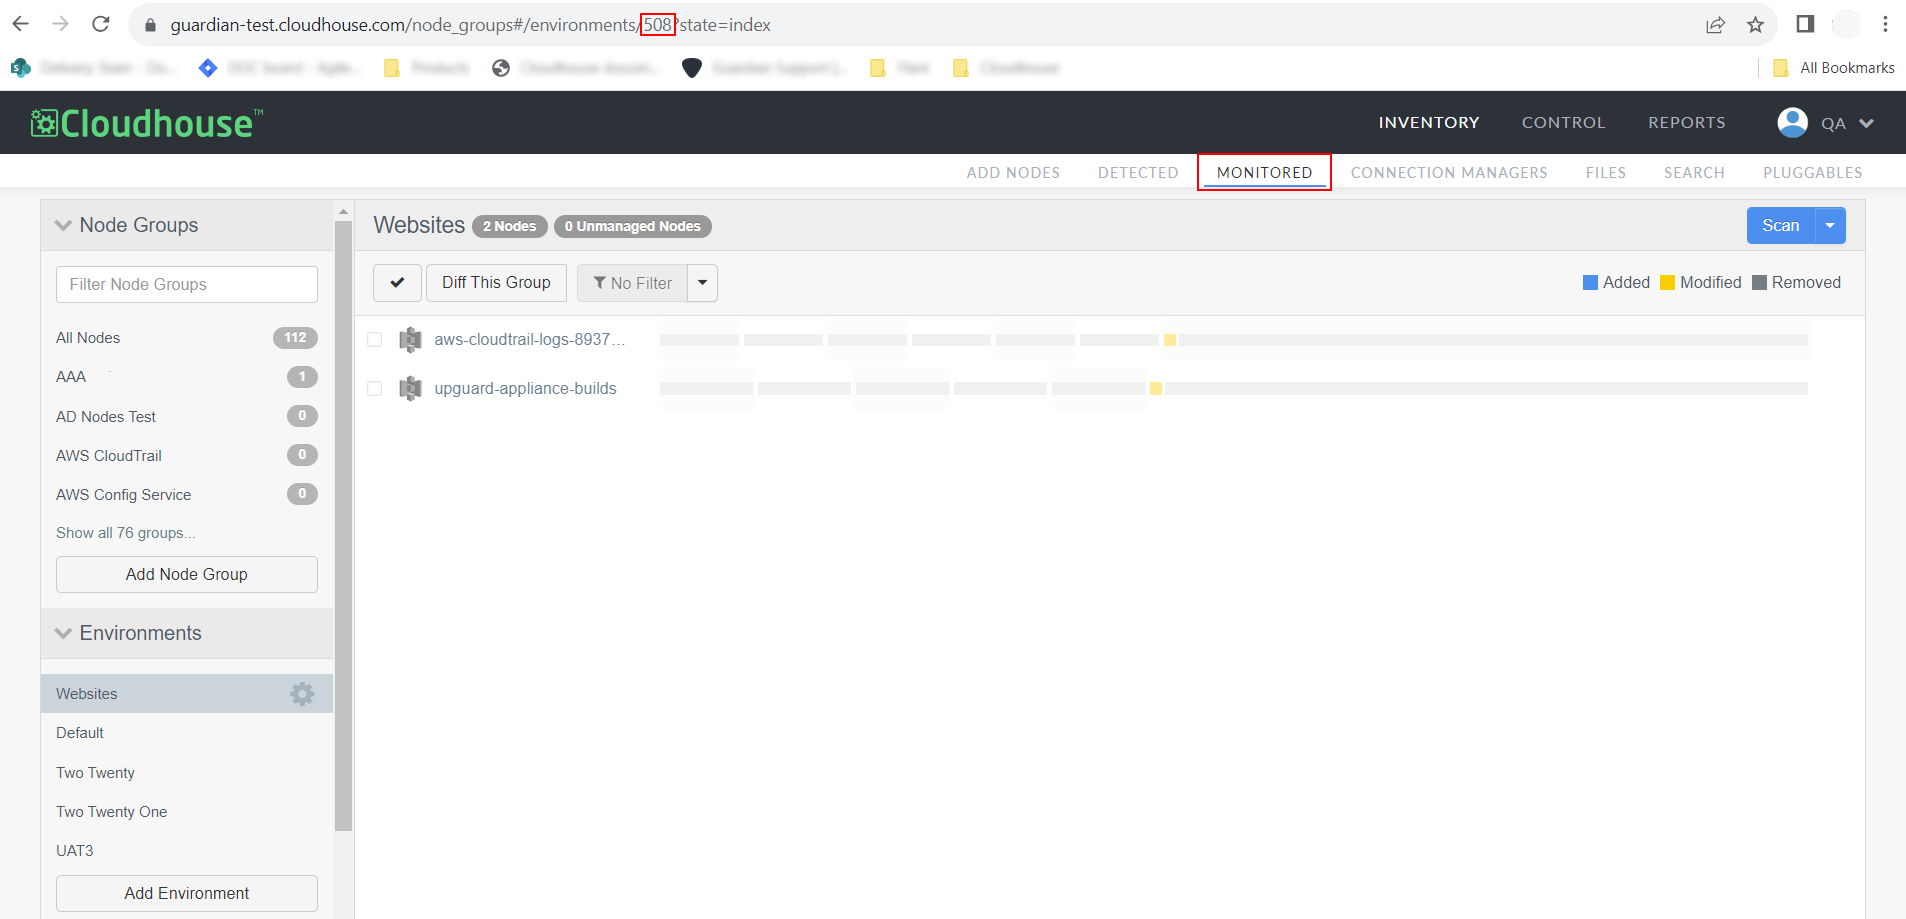
The environment is displayed with each of the nodes currently stored within it. In the URL, copy the digits that are displayed after 'environments/'. This is the environment ID.
Target_Node_Group_ID Optional
The ID of the node group you want the nodes to be stored in. It must be a static node group with no node rules or dynamic group queries, see Node Groups for more information. Cloudhouse does not encourage the use of this field unless otherwise specified by a Guardian Support Engineer.
To locate the node group ID, complete the following process:
Note: If you do not provide a node group ID, the nodes are automatically added to the 'Default' node group.
- In the Guardian web application, navigate to the Monitored tab.
-
Select the static node group that you want to add the nodes to.
-
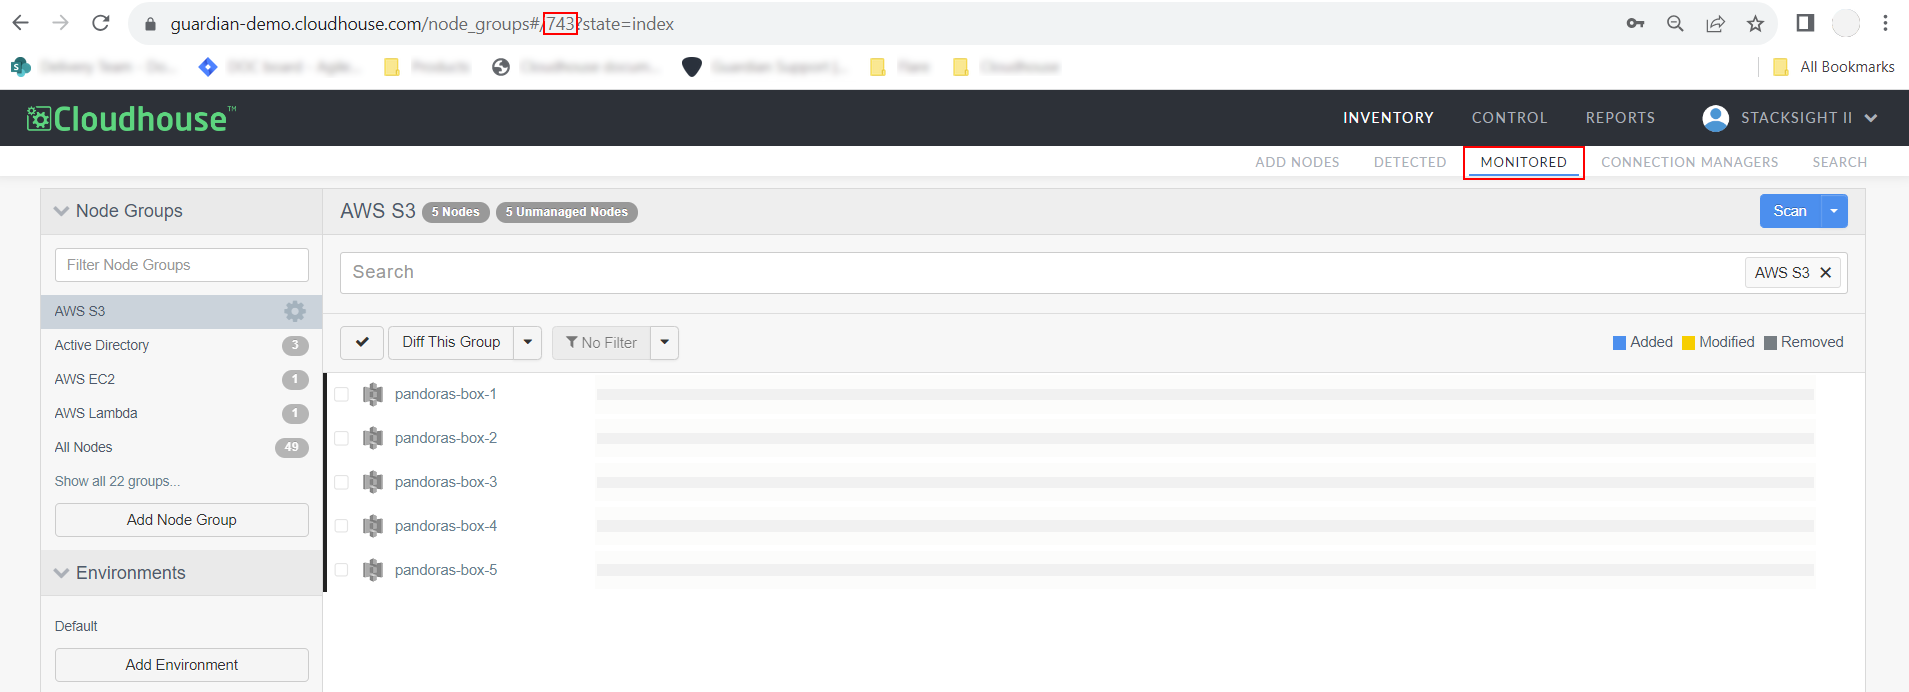
The node group is displayed with each of the nodes currently stored within it. In the URL, copy the digits that are displayed after 'node_groups#/'. This is the node group ID.
Websphere_install_path (Agentless)
The directory path Guardian is to use for the WebSphere installation. This is the directory under which all the WebSphere configuration exists. The path in the publicly available WebSphere docker container is /opt/IBM/WebSphere/AppServer.
Websphere_profile_name (Agentless)
The name of the WebSphere profile you want to add to Guardian for monitoring. The profile name is displayed in the installation directory. The profile in the public docker container is called AppSrv02.
Websphere_cell_name (Agentless)
The name of the cell that you want to add to Guardian for monitoring. This is the name of the administrative domain, managed by a WebSphere Deployment Manager. The cell name is the name of a directory inside the cell directory. The cell in the public docker container is called DefaultCell02.
Websphere_node_name (Agentless)
The name of the WebSphere node that you want to add to Guardian for monitoring. Usually, the node name is identical to the host name for the computer. This value should be unique to the cell stipulated above.
Websphere_jvm_name (Agentless)
Guardian manages most configurations and settings on the Java Virtual Machine (JVM) level. The JVM Name is the name of a directory inside the server directory. The JVM in the public docker container is called server1.
Azure_subscription_id (Agentless)
The unique alphanumeric string that identifies the Azure subscription you want to add to Guardian for monitoring. For more information on how to source this, see Microsoft Azure Account.
Azure_ad_tenant_id (Agentless)
The Globally Unique Identifier (GUID) that represents a Microsoft Entra ID (previously Azure Active Directory) instance. For more information on how to source this, see Microsoft Azure Account.
Azure_ad_client_id (Agentless)
The unique identifier assigned to an application registered with the Microsoft Entra ID (previously Azure Active Directory) instance. For more information on how to source this, see Microsoft Azure Account.
Import the CSV File
Once the CSV file has been prepared and populated, with the required headings set, and the correct information contained in the corresponding rows, you can import the file into your Guardian instance. This is the final step required to add nodes inbulk via CSV.
To import your CSV file, complete the following steps:
-
In the Guardian web application, navigate to the Add Nodes tab.
-
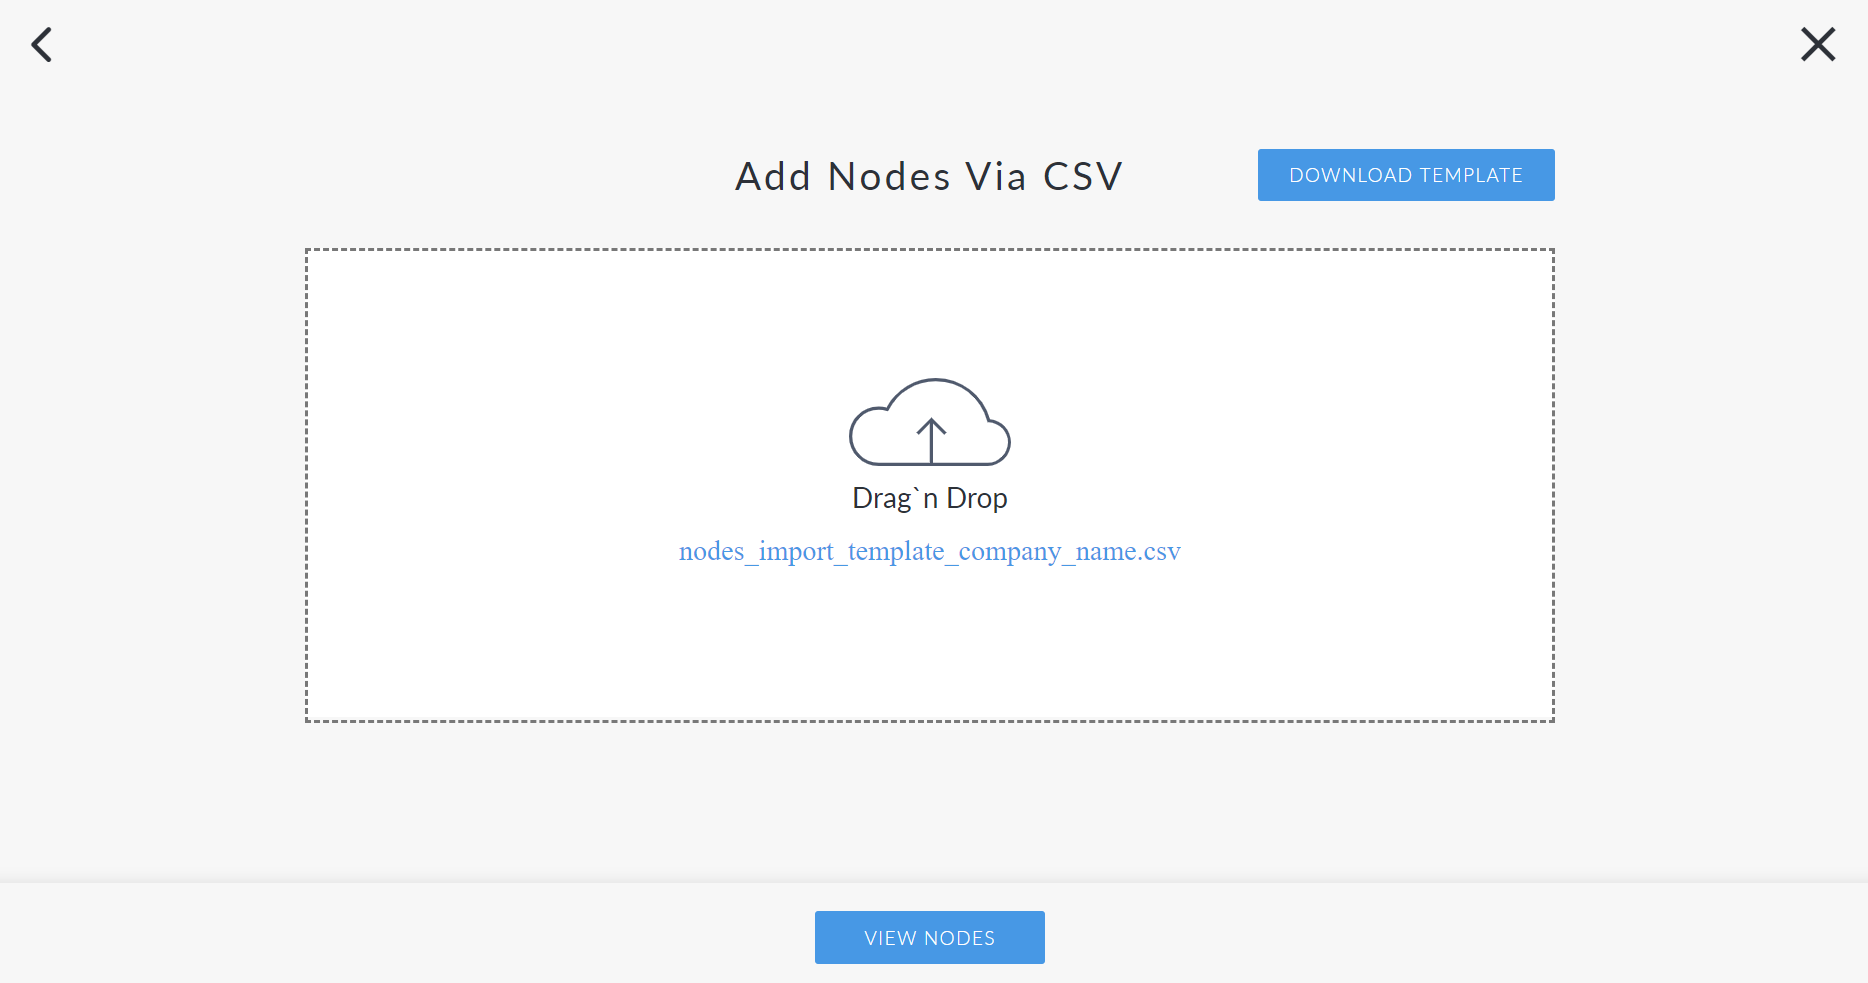
Click the Import CSV button. The Add Nodes via CSV page is displayed.
-
Click to upload the CSV file.
-
Then, click View Nodes to import the template.
If the information in the CSV file is correct, the nodes are imported successfully and the following confirmation message is displayed 'Successfully queued X nodes for creation. Redirecting back to /nodes'. If there is an issue with the CSV file, an error message will be displayed describing what needs to be resolved. Resolve the issue(s) and reimport the CSV file.
Once complete, any nodes that are detected within CSV are automatically added to the Detected tab (Inventory > Detected). Here, you can choose which nodes you'd like to promote to the Monitored tab for regular scanning. For more information, see Detected Nodes.